As mentioned on the main organ page, I, with the help of some VERY
good friends, moved the organ. I had first sought a price from a
professional organ moving concern, but their quoted price was in
the neighborhood of what I had paid for the instrument. Umm,
thanks guys, but no thanks.
Fortunately, the seller and widower of my first organ teacher
lived right across the street from me. That at first appears to make
things easy, but yet you still have the matter of how to get a
third- to a half-ton of wood, metal and leather from point A to
point B?? And to make things interesting, this thing is a finely
crafted piece (well, pieces) of hardware, which probably won't take
too much banging around, and none of my close circle of friends,
including myself, has ever had the pleasure (?) of disassembling
and moving a pipe organ. Could it be done?
The organ was purchased not long before the crush of the holiday
season, so the move was put off until all that was over with.
Looking at the calendar, it appeared that a good time to shoot for
was the President's Day holiday weekend in mid-February 1998. In the meantime,
there was lots of mental plotting and planning, and lots of e-mails
discussing ideas and strategies back and forth to the friends who
would be helping in the move.
The week before the move, I met with a friend-of-a-friend who is a
freelance pipe organ technician, who at one time worked for the
company that built this instrument and had tuned this very organ a
few times. He looked the beastie over, and peered into a number of
nooks and crannies, played all the keys and pedals, and declared
the instrument in good to excellent condition, and advised a few
things to watch for when moving it.
 I bid him farewell, and started into the disassembly, though not
without taking lots of photos first! The pipes were the first
thing to come out, each one being carefully removed and placed in
a cardboard tray, and its position carefully noted in a notebook
diagram of the pipe layout. The pipes were grouped in the trays by
family and/or row in the organ chest and taped into place in the
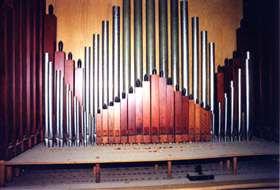
tray with masking tape. The photo at the left is a shot of the
main chest with about half of the pipes removed.
I bid him farewell, and started into the disassembly, though not
without taking lots of photos first! The pipes were the first
thing to come out, each one being carefully removed and placed in
a cardboard tray, and its position carefully noted in a notebook
diagram of the pipe layout. The pipes were grouped in the trays by
family and/or row in the organ chest and taped into place in the
tray with masking tape. The photo at the left is a shot of the
main chest with about half of the pipes removed.
I returned a few nights later to complete the removal of the pipes
and to disconnect the electrical cable that connects the console
(keyboards) to the organ. The cable was original to the organ,
which meant that the cable was built with cotton-covered and
rubber-covered wires. Cotton covered wires are no longer permitted
in modern electrical codes, and the insulation on the rubber
covered wires was hard and brittle, and disintegrated at a touch.
In short, the cable was toast.
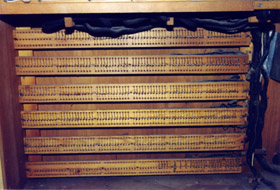 The cable disconnected rather easily from the console, being
terminated in "pin blocks" under the console, pictured at the
right. Each wire was soldered to a pin, which eventually connects
to a key on a manual. To disconnect it, each wire was simply
clipped at the terminal.
The cable disconnected rather easily from the console, being
terminated in "pin blocks" under the console, pictured at the
right. Each wire was soldered to a pin, which eventually connects
to a key on a manual. To disconnect it, each wire was simply
clipped at the terminal.
The pedals unbolted from the console, and the contact blocks under
the pedals unbolted from the pedals, thankfully since the pedal
contact blocks are permanently attached by a 200+ wire umbilical to
the console.
We were ready for the move.
One friend who helped in the move is an old college chum who drove
over 300 miles to come and help -- that alone was a sign of a true
friend. The other friend is a coworker who has a great mechanical
mind. We headed across the street on Saturday morning at 9:30 am
to tackle the task ahead.
First, we completed the cable disconnection by pulling the cable
out from under the floor of the house. Since the cable was not
going to be re-used, it was cut off about 6 feet from the main
organ since the plan for re-wiring was to include fitting new
terminal blocks at the organ.
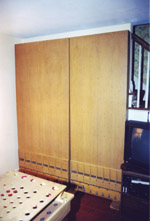 The main organ was rolled out from the wall a bit and the two
cabinets that sit behind the main organ that house the bottom
octave of the 16' Bourdon stop were disconnected and carried across
the street. The photo at the left shows them in place at home.
The main organ was rolled out from the wall a bit and the two
cabinets that sit behind the main organ that house the bottom
octave of the 16' Bourdon stop were disconnected and carried across
the street. The photo at the left shows them in place at home.
Now for the main organ chest. To reduce the weight of the thing --
still a couple of hundred pounds with the pipes removed -- the
power supply and blower cabinets were removed and carried
separately. The main swell box was disassembled and removed. The
front panel with the swell shades came off relatively easily, since
it is hinged at the top, and the main box was removed in one piece.
The organ chest was rolled to the doorway and carried out the door.
We tried to roll it across the street, but the casters under the
chest had flattened from sitting in one place for so long,
supporting so much weight. So, we ended up carrying it across the
street. The chest went easily in and out of the doors as it is
only 26" wide, in case you were wondering.
The swell box followed, which was interesting trying to move this
huge box, which is 6 ft wide and 4 ft high, and while not
particularly heavy, was extremely awkward. But with three people,
we managed it. Now at home, the box was reattached to the chest,
the blower remounted and connected, and the main organ was rolled
into position in front of the pedal pipes. The pedal pipes were
reconnected to the air supply and the shell of the organ was in
place.
Now for the console. Unfortunately, there wasn't much that came
off the console other than the pedals and the cable, which meant
there was still a lot of wires, metal, and heavy oak still in one
unit. Which is to say it is a heavy bugger!! We managed to get it
out of the house down to the sidewalk, but by that point we knew
that we had no desire to carry it across the street. A industrial-
strength two-wheeler was pressed into service and we managed to
roll it across the street. Then it was up the stairs and into the
house and into position. All the pieces were in place!
 My coworker friend bowed out at that point, and my college chum and
I set about racking the pipes. The organ had not been moved in
over 25 years, so there had been a fair amount of dust collected in
and on the pipes. Some pipes I had dusted off and blown out in the
week before the move, but there were others I hadn't gotten to.
So, with an air compressor and a brush, the remaining dirty pipes
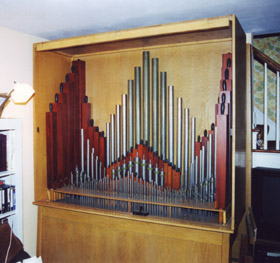
were brushed off, blown out and put into place. The picture at the
right shows the organ after the pipes were placed, and before the
front panel with the swell shades was replaced, and this was around
4:30 Saturday afternoon. The swell shades were installed. We were
getting there.
My coworker friend bowed out at that point, and my college chum and
I set about racking the pipes. The organ had not been moved in
over 25 years, so there had been a fair amount of dust collected in
and on the pipes. Some pipes I had dusted off and blown out in the
week before the move, but there were others I hadn't gotten to.
So, with an air compressor and a brush, the remaining dirty pipes
were brushed off, blown out and put into place. The picture at the
right shows the organ after the pipes were placed, and before the
front panel with the swell shades was replaced, and this was around
4:30 Saturday afternoon. The swell shades were installed. We were
getting there.
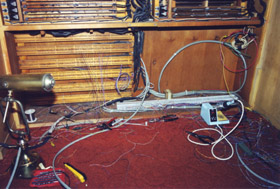 Now for the wiring. It was decided in the weeks before the move
that the cabling between the organ and the console would be done with industry-
standard telephone cabling and telephone-type punch down terminals
to facilitate the wiring, troubleshooting, and any future moves.
The new blocks were mounted in the bottom area of the console, and
wires connected between the pin blocks and the punch down blocks.
The picture at the left shows the wiring in process. What a
mess!!
Now for the wiring. It was decided in the weeks before the move
that the cabling between the organ and the console would be done with industry-
standard telephone cabling and telephone-type punch down terminals
to facilitate the wiring, troubleshooting, and any future moves.
The new blocks were mounted in the bottom area of the console, and
wires connected between the pin blocks and the punch down blocks.
The picture at the left shows the wiring in process. What a
mess!!
At the organ end, the original cable just went up into the chest
was directly connected to the electropneumatic valves. The 6 ft of
cable left on the organ needed to be connected to the punch blocks
that were to be installed at the organ end. Since the original
cabling was all that cotton covered stuff and all the same color --
how to find which wire went where? Fortunately, the cable was
bundled by pipe family -- Fugara, Gedeckt, etc. -- and it was an
easy matter to figure out which bundle went to what family. Now to
isolate the notes. After a little while of trial and error to pick
out the lowest note, the half step up from that, etc. -- when one
does NOT have perfect pitch -- I came up with the scheme of
removing the next pipe I wanted to find, and then hunt around with
a clip lead on the wire bundle until the note that went CHUFF
instead of TOOT was found. That wire was punched into the block,
labelled, the pipe replaced and the next one pulled. Times 269
pipes!!! Well, 257 times as the pedal pipes were identified with
a different method.
My college friend left for home Sunday afternoon, and at that time
we had the bottom two octaves of the Gedeckt rank playing at the
console. Not bad for less than 24 hours after the move was
completed. I continued with the wiring the rest of the day Sunday,
and by the time I was cross-eyed from playing with all those
terminals and wires, the entire Gedeckt rank was playable, and
about half of the Fugara was working.
With Monday being a holiday, I spent most of that day continuing
with the wiring. By the "end of work" on Monday, the Rohrfloete
rank was operational. After work on Tuesday the mixture was hooked
up, the pedals attached and the organ was complete.
In the weeks and months since, other little tasks were
completed: namely some clean-up in the wiring connections under the
console and at the organ end; a remote relay starter was
constructed so that the organ can be switched off and on at the
console; small lights were mounted under the lower manual to
illuminate the pedals, and were wired to go on and off with the
organ. And on it goes.
The tuning of the organ held up fairly well in the move. I was
advised by the organ tech friend that it would need a "major
tuning" after the move, but it really wasn't too bad. There
were a number of the Rohrfloete pipes that were out of tune, as the
chimney caps slide easily, and about a dozen or so of those pipes
were affected. Those pipes are easy to tune without any special
tools, and I touched up the worst offending pipes. I "put up" with the
tuning of the instrument through the first summer and into fall. By then
I had found a supplier for and purchased a set of tuning cones and a
scroll key tool and I set about doing a complete tuning myself in early December.
For a note reference, I used my Roland SoundCanvas® set on the Sine Wave
tone, and beat each pipe against that. That worked very well and when I was done,
the organ sounded terrific! Unfortunately, it didn't last...
It turns out the nuts on the screw eyes that adjust the tension on
the schwimmer springs on the regulator were loose and were changing position with
use, hence throwing off the tuning. Those original double nuts were replaced with
nylon insert lock nuts, the tuning touched up and it has held very well since. Even after
the second organ move I didn't have to do any tuning beyond
touch-ups.
In conclusion, this has been an adventure well worth the undertaking. I
now know a lot more about the instrument that I ever did before, or
would have if someone else had moved it for me. With doing the
wiring myself, I know exactly how it all goes together and can
chase out any problems (which there haven't been) myself. If you
find yourself faced with a similar move -- take heart, it's been
done before, and successfully -- not only once, but twice!